Dymo LabelWriter Wireless - Getting Started
18 September 2017
Getting Started
Follow the instructions in this section to set up your wireless label printer to print from your computer. To get started you will:
- Connect the power.
- Load a label roll.
- Connect the printer to your wireless network.
- Install the software you will use to print labels.
- Add the printer to the software on either your computer or mobile device.
Connecting the Power
The different LabelWriter printer models may have different power requirements. Make sure to only use the power adapter that
was included with your label printer.
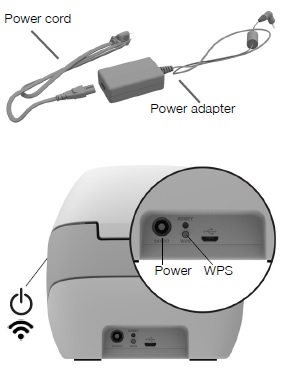
To connect the power
- Plug the power cord into the power adapter and plug the power adapter into the power connector on the back of the printer.
- Plug the other end of the power cord into a power outlet.
- Press on the side of the printer to turn on the power.
The power status light will flash for a few seconds and the wireless status light will blink.
Loading Labels
Each label roll comes in a black plastic bag. Make sure to store the label roll in this bag when the labels are not being used.
Important!
In order for the labels to feed properly during printing, pay attention to the following when loading labels on the spool and into the printer:
- Make sure the power is turned on.
- The label spool guide must be pushed flush against the label roll, with no gap.
- The labels must be loaded with the left edge of the label inserted against the left edge of the label exit slot.
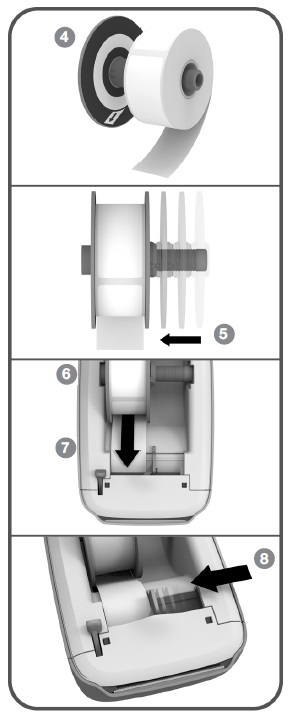
To load a label roll
- With the printer turned on, press the label reverse feed button to eject the labels that protected the printer during shipment.
- Open the top cover and remove any packing material inside the label compartment.
- Remove the label spool from inside the cover and separate the spool guide from the spindle.
- Hold the spool spindle in your left hand and place the label roll on the spindle so that the labels feed from underneath and the left edge of the label roll is firmly against the side of the spool.
- Slide the spool guide onto the right side of the spool and press the guide tightly against the side of the label roll, leaving no gap between the roll and the spool. To ensure proper feeding of labels during printing, the label roll must fit snugly against both sides of the label spool, with no gaps.
- Insert the label spool into the slot in the printer cover with the labels extending from underneath the roll.
- Align the left edge of the label with the left edge of the label exit slot and insert the label into the slot. The printer automatically advances the labels, stopping at the beginning of the first label. If the printer does not feed the labels, make sure the first label is fully inserted and then press the label forward feed button on the side of the printer. If the first label on the roll is not a full label, press the label forward feed button to eject the partial label. Regardless of the label width, the left edge of the label must be aligned with the left edge of the label exit slot for the labels to feed properly.
- Slide the label guide to the left until the label guide aligns with the right edge of the label. Make sure that the label guide does not pinch the label.
- Carefully lower the top cover.
.jpg)
.jpg)

.jpg)